The elements inherit CSS properties from their parent elements that’s all it is.
eg, sa we have an HTML like below
<div>
    <p>Hello world!</p>
</div>
We can just apply a text color to the div tag and it will be applied to the p tag as well since it inherits from the div tag
div{
color: blue;
}
Note: Browsers also have some default styles set for elements, e,g buttons,anchor tags have some default styles from browsers in that case the inheriting will not work and we will have to add the specific styles to the respective tags
CSS is parsed from top to bottom, i.e style that is written at the top will be overridden by the one being written below it if they have same specificity
Specifity decides which styles to apply, more specific the selectors are more priority the styles get and the one with the most specigicity is only applied while overiding the lower ones
Element Selector
Class selector
Id selector
!important keyword
Inline styles
above selector are listed from least specific to most specific, they can be combined together to create rules that are more specific
e.g
#text-id {
color: pink;
}

.text{
color: black;
}
In above even though .text rule is after #text-id one, the #text-id one will be applied since it has more specificity
note : do not use !important since it is hard to override them
My code quality has improved a lot, one thing I learned since last 3 months of training at rtCamp is
If something works, we might believe that that is the way, only way to do it, but it is just only single way that worked at that time.
it may or may not work in future, even it may not be the right way to do things, we should always find multiple ways to do something and then choose one of them.
It is an Open Source E-commerce Plugin that we can use to create a full fledged online store and customize it to our liking.
It can also integrate with payment gateways, promotions emails, tax calculations and many things.
You have to give it a try, install on local to fully know its potential, it also has REST API support so we can use it as back-end and integrate with any other front-end of our choice
Testing
Why?
Why write tests, well its a silly question to ask. We test the code we write to make sure that it works or not, if our code doesn’t work of what use it will be. Is that the only aspect of testing? to make sure it works.
Writing Tests gives us confidence in our code, we can refactor the code as much as we want and if we do something wrong tests are there to know.
How?
We can test by multiple ways, one of the most sane idea is to run the code manually and check the output if it is what we expected or not, but what if the checklist is too long, we will not be able to do it manually.
We can use tools, that test our code, we have to write the test obviously but the tools automate all the other things, like running the test, generating report, check how much code is covered by tests etc.
Unit Testing
Unit of a software is like a smallest part that can be tested, for example a function that takes some input and gives some output, it is a unit.
We run the tests against this units individually, in isolation to catch any errors early.
PHPUnit
PHP Unit is a framework for testing PHP code, basically it allows us to write code that tests our code!
To install it we can get the PHAR (PHP Archive) and make it executable
final class EmailTest extends TestCase
{
    public function testCanBeCreatedFromValidEmail(): void
    {
        $string = 'user@example.com';

        $email = Email::fromString($string);

        $this->assertSame($string, $email->asString());
    }

    public function testCannotBeCreatedFromInvalidEmail(): void
    {
        $this->expectException(InvalidArgumentException::class);

        Email::fromString('invalid');
    }
}
Full Site Editing in WordPress allows us to edit our whole site and make it very different than the template we started with, the changes we make are stored in the database so even if new theme is installed, we can reuse the template parts and patterns we created.
The Site Editor
When a block theme is installed, the site editor is enabled and can be accessed from the admin dashboard, this works similar to the customizer API for Classic Themes but has many advance features.
Template Editing
We can edit each individual templates from the site editor, add new templates and assign them to post or pages. It is not advised to directly modify the templates provided my themes and to create new ones so changes will not be erased when theme is updated.
This is how the editor navigation looks like!
This new features changes how the WordPress themes are created, we can create a whole new theme only from the editor and serve it to users and they can modify it accordingly.
The content writing and publishing experience can be improved with this.
Creating Block Theme
The directory structure of a Block Theme is slightly different from the classic theme, the main differences are
In class theme we can put our templates anywhere and access them, in block theme we have to put then under directory templates
The .php template files in classic theme are replaced with .html templates
The template parts need to reside in parts directory
Let’ create a simple block theme!
The main requirements for getting started with block themes are the style.css and index.html file
style.css
/*
Theme Name: Block Theme
Description: Basic block theme created from scratch
Author: Pratik Londhe
License: GNU General Public License v2 or later
License URI: http://www.gnu.org/licenses/gpl-2.0.html
Text Domain: block-theme
Version: 1.0
*/
The style.css we write here is same as the one for the classic theme, with header information
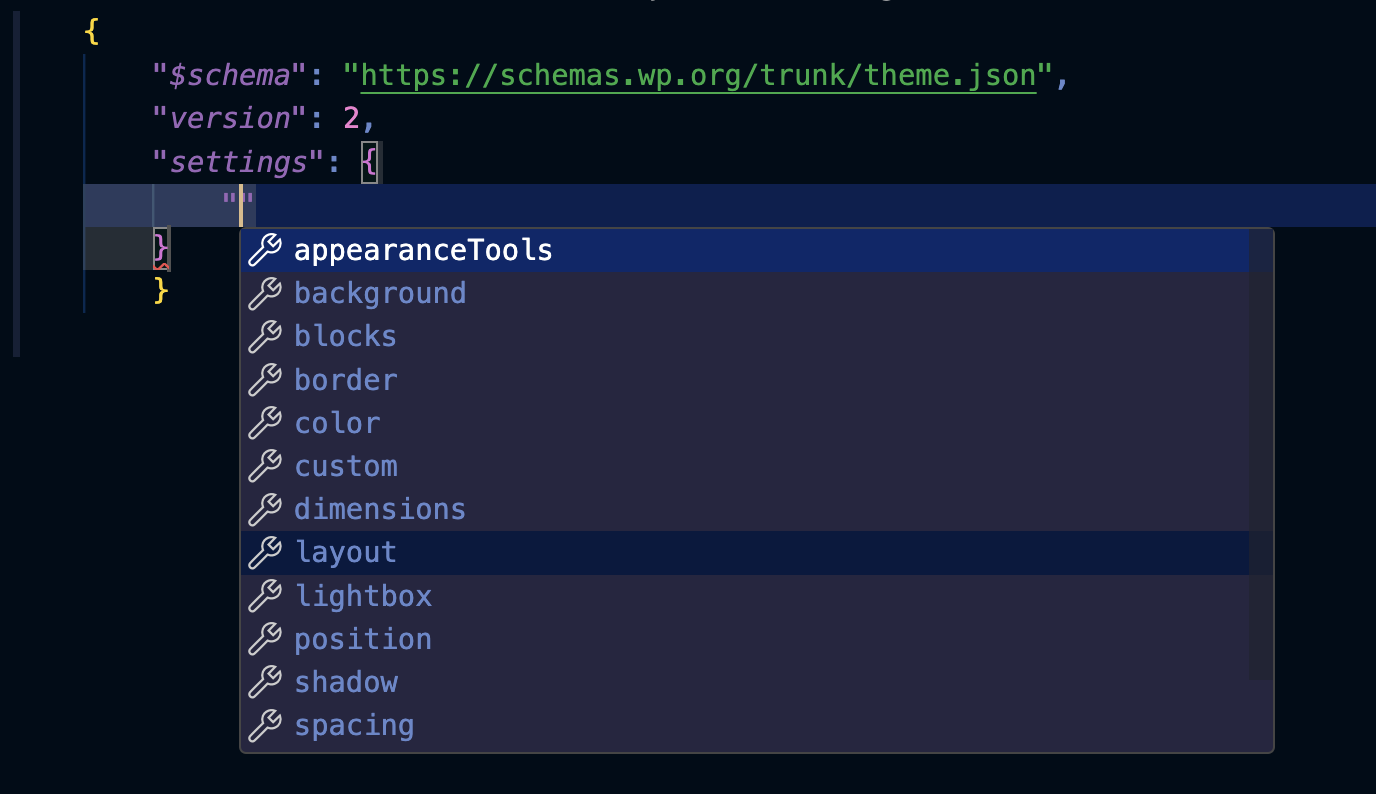
The theme.json file is very powerful and can be used to change the styles and settings of block editors, individual blocks.
The basic theme.json may contains color pallete by the theme and some settings to add block supports like border etc.
We don’t have to enqueue the theme.json file, just create it and add in the root directory of the theme and WordPress will take care of the rest, the styles we define in theme.json are converted into CSS on the fly and are applied globally to the blocks.
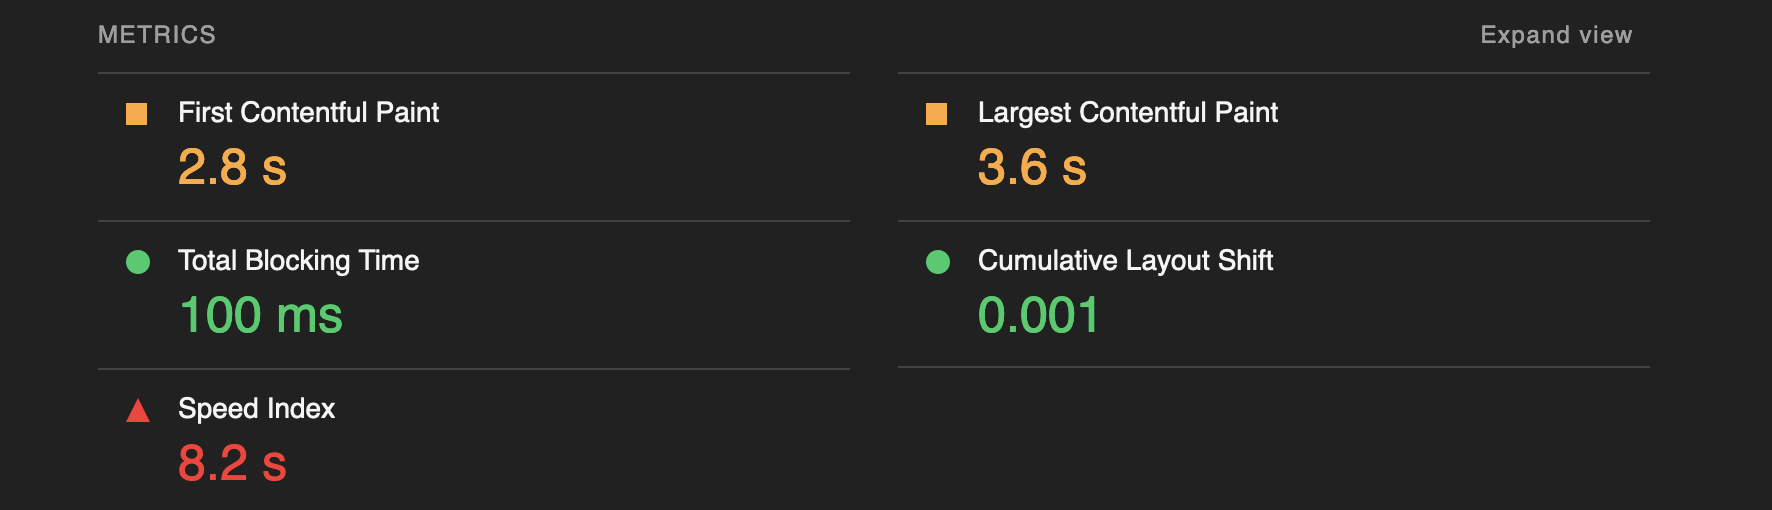
Core Web Vitals are metrics used to measure real-world user experience for loading performance, interactivity, and visual stability of the page.
The Core Web Vitals Include metrics like
LCP: Largest Contentful Pain.
FID: First Interaction Delay.
CLS: Cummulative Layout shift
We can use tool lighthouse to measure this things
Install the npm CLI tool Lighthouse
npm install -g lighthouse
Run it to test for your site url
lighthouse https://pratiklondhe.dev/ --view
we are using –view so the HTML report is opened immediately
SEO (Search Engine Optimization)
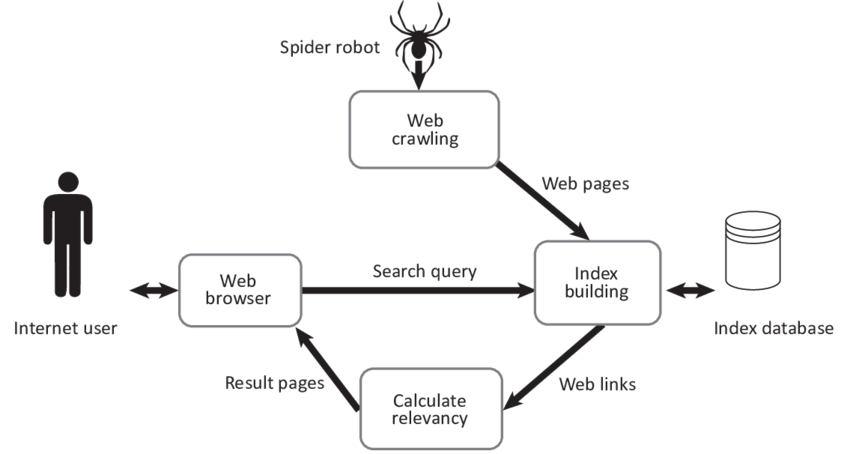
The Google search engine uses index to store info about the sites on the internet so that when user searches something the results can be served.
Many sites get added everyday, for this to work Google uses crawlers to access the content of the site and analyses it to store in the index.
Key Concepts in SEO
Index – Google stores the pages that it knows in a database known as an index.
Crawl – It is a process of going through the site to get information and data about the site.
Crawler – It is an automated software used for Crawling
Googlebot – Name of the Google Crawler
SEO – Search engine optimization: the process of making your site better for search engines.
structured data or schema
We can define a structured markup for our web page to let the Search Engines know about the type of content we are serving like News, Article, Recipe, Music, Movie, Video, etc.
We can do that using 2 formats
JSON-LD
MicroData
The JSON-LD format (JSON for Linking Data) is a method of encoding linked data using JSON, as it is based on JSON which is human readable and also serializable.
The Inner Blocks component can be used to add one or more inner blocks inside a block.
But, it will only allow to add one Instance of the Inner Blocks per block, so if we have to add multiple inner blocks or even create a layout using inner blocks, we have to code multiple components and use them.
Now, we want to create layout that allows use of multiple, for that we can create more elements and add them as children to our block.
slotFills
Slot Fills are part of Block Editor system that offer a way to extend and customize the editor’s interface by adding our own content or controls to the various slots (positions) within a block where we can insert additional components/content
Slot and Fill are a pair of components which enable developers to render elsewhere in a React element tree, a pattern often referred to as “portal” rendering. It is a pattern for component extensibility, where a single Slot may be occupied by an indeterminate number of Fills elsewhere in the application.Ryan Welcher – Extending Gutenberg With SlotFill and Filters
WordPress is open source, means it is maintained by people around the world, many people contribute their time and resources to make WordPress better and we can too.
There are multiple ways to contribute to WordPress core
Code contributions :
We can work on the tickets in the WordPress trac (the software used for issue tracking in WordPress), and contribute our code to fix bugs or add new features
Reporting Bugs:
If we don’t have capacity to work on the code, we can report the bugs that we encounter, which in turn helps to make the WordPress better and better.
Contributing Documentation
We can update the documentation of newly added features or create examples for functions hooks etc
The WordPress uses SVN as version control, which is a centralized VCS contrary to the GitHub that we are familiar with, but we don’t have to be very good at SVN to contribute code in the core, we can use the existing git/GitHub and create diff files to open new ticket.
Steps:-
Clone the master branch from the github repo
Create new feature branch and work on the issue
Generate a diff file using the git diff command
Upload that diff file with relevant information to the https://core.trac.wordpress.org/
The good first bugs section has bugs that are for new contributors, so we can work on them.
By default block provide their styles to the themes, without any change. Themes can also override the block styles, or not provide any styles and rely on the block styles.
Here are the theme support for blocks
Editor Color Palette – A default set of colors is provided, but themes can register their own and optionally lock users into picking from the defined palette.
Editor Text Size Palette – A default set of sizes is provided, but themes can register their own and optionally lock users into picking from preselected sizes.
Responsive Embeds – Themes must opt-in to responsive embeds.
Frontend & Editor Styles – To get the most out of blocks, theme authors will want to make sure Core styles look good and opt-in, or write their own styles to best fit their theme.
Block Tools – Themes can opt-in to several block tools like line height, custom units.
Core Block Patterns – Themes can opt-out of the default block patterns.
We can use the function add_theme_support to opt in for this features
This might look little big at first, but it is very simple, first we are getting the current post type as it is required to query the postmeta and save the values.
Then we are using the hook useEntityProps to get the meta values of that post
And using TextControl with event handlers we are adding that post meta, here it is how it looks
Notices
Notices serve as informative user interface elements that appear at the top of admin pages. They are used by WordPress core, themes, and plugins to communicate the outcome of an action or to highlight important information to the user.
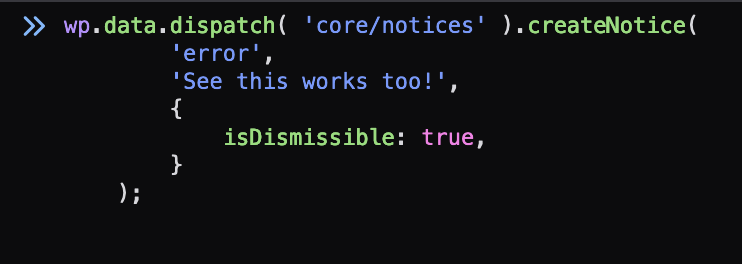
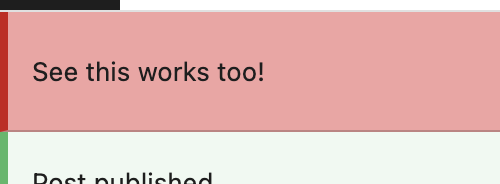
Everything in the block editor context is just simple, to add a notice to the block editor we can use the function createNotice
wp.data.dispatch( 'core/notices' ).createNotice(
        'error',
        'See this works too!',
        {
            isDismissible: true,
        }
    );
The notices can be of type success, info, warning, error.
The isDismissible attribute sets if the notice should be dismissible or not.
When we add any dynamic blocks, we need to use meta data related to the post to display in the block, like for a movie its runtime, release date are all metadatas
How to access them in the WordPress blocks, when it comes to the PHP render callback that we use the API is pretty strightforward and easy to use inside the query loop to get the metadata.
For the use in blocks Edit function, we can use the data store of the WP using the useSelect hook, from that we can get the post data but how to get the meta, for that we can use the useEntityProp hook
The function provides a way to remove a editor panel, it can be useful when in our theme or plugin we want to override some functionality and remove existing panels.
We can customize the editing experience for the clients, maybe even apply some authorization on the editing experience.
IF our blocks are not fully dependent on the server side, we don’t have to register them in the block registry of the server, we can register them only on the front end and make them work.
registerBlockType('mlb/myfirst', {
	title: "My First Block",
	category: 'text',
	icon : 'smiley',
	edit: Edit,
	save: Save,
});
Dynamic Blocks and the attributes!!!
I encountered an issue while creating dynamic blocks. The save function was returning null, and the block render callback was defined in PHP. How are the attributes stored?
I was trying to give the attributes types like number, boolean, etc., but no matter what, in the editor, they won’t work because the save function was not there.
The attributes are getting stored in the database post, but when rendering in the block editor, their types change. In the DB, they are stored as a string, but we have defined them as different types in our block.json.
To fix it, we can just change their type to string.
Nested blocks is an approach in which we can create blocks that can hold other blocks inside them, this way we can create some complex UI structures.
The blocks residing under a parent block are known as inner blocks, it is super easy to add InnerBlocks in WordPress, they provide an component InnerBlocks in the package @wordpress/block-editor that can be used to add inner blocks.
import { InnerBlocks } from '@wordpress/block-editor';

const Save = () => {
	return (
		<>
			<h1> Hello from here!</h1>;
			<InnerBlocks.Content />
		</>
	);
};

export default Save;
We will be updating our blocks edit and save scripts to add the inner blocks
The InnerBlocks component takes allowedBlocks as props where we can provide an array of block allowed to be inserted in our inner blocks position.
This gives a way to create flexible layouts, add optional blocks and display them on frontend!
Do we have to manually enqueue the scripts for our block?
The block.json file contains metadata about our block, it also contains values for the scripts and styles files.
We don’t have to enqueue them as when we call the wp_register_block_type() function, they are enqueued in that.
I could not find any direct reference to the functions like wp_enqueue_scripts() or wp_enqueue_styles() inside the definition of register_block_type() function but it does parse the json metadata of block and created handles for the scripts and styles
I will have to look through more to get how it is done, but I am sure the scripts and styles are getting loaded automatically.
What about i18n ? , for JS use the package wpi18n provides similar functions like __() to make the static string translatable, but the actual translation it takes from the server so for this to work we will have to load the text domain of our plugin and add the i18n in the scripts files.
how does the WordPress parses our block.json?
As we are using JSON format, WordPress has inbuilt function wp_json_file_decode that is used to get our metadata from block.json file, then the properties are mapped with a predefined associative array, similar to like the parse args,
A loop runs that registers the scripts and styles using the functions register_block_script_handle and register_block_style_handle
Also, if our block is supposed to be dynamic then we also have to provide a callback to render the the block, that is registered in the function.
The Settings array holds all the details about our blocks.
Useful hooks in the @wordpress/block-editor
useBlockEditingMode
Allows a block to restrict the user interface that is displayed for editing that block and its inner blocks.