Author: Pratik Londhe

  • customizer


    The customizer in wordpress provides user feature to live preview the changes while editing the theme options.

    Say the user want to see how the new header image will look it can be viewed in the customizer, user does not need to publish the changes.

    The customizer has following objects

    • Panels
    • Sections
    • Settings
    • Controls

    Settings:-

    • We can add two types of settings, theme_mod and option

    Theme Mod:

    The theme mod are primarily used for storing customization data realated to the specific theme,

    Each theme can have its own theme mods, they are not shared across other themes.

    Theme Option:

    The options will be stored directly in the wp_options table, and will be applied regardless of which theme is activated.

    We should almost always use the theme mod over options settings for our theme.

    Control:-

    Controls are the objects that display the UI for a setting

    It is must that each control must be associated with a setting. That setting will be used to save the data entered by user in the control.

    Section:-

    Sections are containers for controls, we can use them to organize related controls of our theme.

    There are many in built customizer sections, here’s the list of core sections:-

    TitleIDPriority (Order)
    Site Title & Taglinetitle_tagline20
    Colorscolors40
    Header Imageheader_image60
    Background Imagebackground_image80
    Menus (Panel)nav_menus100
    Widgets (Panel)widgets110
    Static Front Pagestatic_front_page120
    default160
    Additional CSScustom_css200
    source

    Or, we can add our own sections if the settings we are adding do not match with the built in sections.

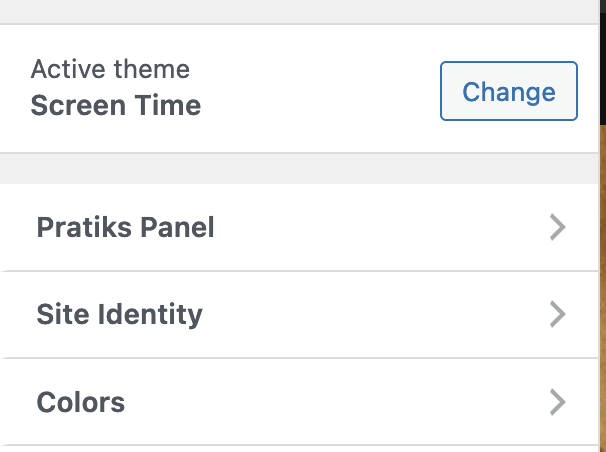
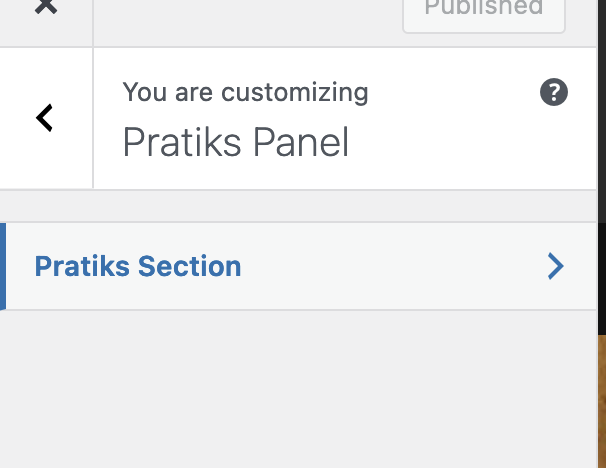
    Here is the combined code that create a panel, in that it adds a section and for that section it created a control in it.

    Things to remember:-

    • A Panel must have at least one section in it
    • A section must have at least one control in it
    • There must be a setting associated with a control
    function add_panel( $wp_customize ) {
    	$wp_customize->add_panel(
    		'pratiks-panel',
    		array(
    			'capability'     => 'edit_theme_options',
    			'theme_supports' => '',
    			'title'          => 'Pratiks Panel',
    			'description'    => 'Pratiks Panel',
    			'priority'       => 10,
    		)
    	);
    
    	$wp_customize->add_section(
    		'pratiks-section',
    		array(
    			'title' => 'Pratiks Section',
    			'panel' => 'pratiks-panel',
    		)
    	);
    
    	$wp_customize->add_setting(
    		'test',
    		array(
    			'type'       => 'theme_mod',
    			'capability' => 'edit_theme_options',
    
    		)
    	);
    	$wp_customize->add_control(
    		'test',
    		array(
    			'label'   => __( 'Thoughts' ),
    			'type'    => 'textarea',
    			'section' => 'pratiks-section',
    		)
    	);
    }


    add_action( 'customize_register', 'add_panel' );


  • day 45

    • Adding capability to user (not role)

    To add capability directly to user, we can use the add_cap() method in the WP_User class

    $user_id = get_current_user_id();
    $user = new WP_User( $user_id );
    $user->add_cap( 'edit_posts' );
    
    
    • Fields in usermeta table

    The usermeta table consists of key value pairs of meta information about the user. IT contains following fields

    • first name
    • last name
    • nickname
    • show_admin_bar_front
    • wp_capabilities
    • wp_user_levels
    The Header API

    The wordpress plugins and themes are identified by the header comment used in index.php and style.css respectively.

    It contains information like the version number, uri. We can make use of this info internally to perform update on the custom db tables we have created.

    For that we can get the version number of our plugin using:-

    require_once( ABSPATH . 'wp-admin/includes/plugin.php' );
    
    $data = get_plugin_data(WP_CONTENT_DIR . '/plugins/movie-library/movie-library.php');
    var_dump($data['Version']);
    die();
    
    The wp HTTP API:

    The HTTP api wrapper methods can be used to send requests like GET, POST and HEAD. But what if we want to send request of another method?, for that we can use the wp_remote_request() method

    $response = wp_remote_request( 
    	'https://dev-bkp.local/wp-json/wp/v2/',
    	array( 'method' => 'PUT' ));
    

    Other methods in the API

    • wp_remote_get()
    • wp_remote_post()
    • wp_remote_head()
    Disabling wp cron

    The WP Cron system is not true cron, it needs a request to be made by the user so that the cron jobs are run. What if there are some critical jobs that needed to be run and we got no requests?, for that what we can do is disable the default behaviour and use of our system cron to run the cron jobs.

    We can use command to send request directly to the cron.php and make the cron jobs run instead of relying on external requests.

    For that first we have to define the constant to disable deafult cron behaviour

    define('DISABLE_WP_CRON', true);
    

    Then we can use crontab e and add new entry, we can use a tool like CURL to make request to the cron.php of our site

    */05 * * * * curl http://bkp-dev.local/wp-cron.php?doing_wp_cron

    This will run every 5 minutes.

  • Creating custom tables and more…

    Do we really need to create custom tables ?

    WordPress has it’s own schema covering most of the use cases for our plugins but sometimes, it is not the right solution to use the inbuilt tables only.

    Maybe we want to store data very unrelated to what the wordPress already does.

    Here is how to create custom table, for that we are going to use `dbDelta()` function that wordpress uses itself when upgrading.

    Let’s start by writing the SQL query

    global $wpdb;
    		$table_name = $wpdb->prefix . 'rt-person_meta';
    
    		$charset_collate = $wpdb->get_charset_collate();
    
    		$sql = "CREATE TABLE `$table_name` (
    			meta_id bigint(20) NOT NULL AUTO_INCREMENT,  
    			`rt-person_id` bigint(20) NOT NULL DEFAULT '0',  
    			meta_key varchar(255) DEFAULT NULL,  
    			meta_value longtext,  
    			PRIMARY KEY (meta_id),  
    			KEY `rt-person_id` (`rt-person_id`),  
    			KEY meta_key (meta_key)
    			) $charset_collate";
    

    Now, call the function to create this table

    require_once ABSPATH . 'wp-admin/includes/upgrade.php';
    		dbDelta( $sql );
    

    As we are using this as a meta table we have to let the wpdb know about our meta table for that we can use

    $table        = 'rt-person_meta';
    		$wpdb->$table = $wpdb->prefix . 'rt-person_meta';
    

    Ok, done with this, now we can use the already existing meta functions, just pass the post_type as our own like rt-movie or something.

    It will then check for the entry of wp_rt-moviemeta in the wpdb, and if there is a table it will use that.

    Will the meta query work though?

    • I printed the query after creating the tables and it was somehow using the wp_postmeta table instead of our custom
    • I had specified the post_type but it was taking it as just post

    Why does it not work?

    I don’t really know for sure, but this could be the reason, so meta query uses the class WP_Meta_Query to generate the sql that will be added to the main sql to query the database accordingly.


    Adding new role

    We can have many use cases to add a new role to maange only specific post types and not all the others!, for that we can create new roles, custom capabilities and assign them,

    To create a new role we can use the function add_role()

    add_role(
    			'movie-manager',
    			__( 'Movie Manager', 'movie-library' ),
    			$capabilities
    		);
    

    We should add this in plugin activation hook, as it should be called only once, We can also remove the role using function remove_role()

    remove_role( 'movie-manager' );
    

    We will add this in the plugin deactivation hook.


  • invalidating transient cache..

    In our assignment task we are creating a widget that queries the db, gets the movies and shows them as a list.

    We are using transients to store the query results, so we don’t have to run another complex query on the db to get the data.

    The expiration is set to 4 hours currently. What if new movies get added to db or existing movies meta data is updated.

    We are using the meta query to get the posts by rating and release date.

    This is the query I am using

    $args   = array(
    			'post_type' => 'rt-movie',
    			// Using meta_key is necessary because the rating is stored as a meta data of movie post type.
    			'meta_key'  => 'rt-movie-meta-basic-rating', // phpcs:ignore WordPress.DB.SlowDBQuery
    			'orderby'   => 'meta_value_num',
    			'order'     => 'DESC',
    		);
    		$query  = new WP_Query( $args );
    		$movies = $query->posts;
    

    And using the code to save the results in the transients, but if it is already saved then don’t run the query just return the results.

    $movies = get_transient( 'mlb_top_rated_movies' );
    		if ( $movies ) {
    			return $movies;
    		}
    		....
    		$query  = new WP_Query( $args );
    		$movies = $query->posts;
    
    		set_transient( 'mlb_top_rated_movies', $movies, HOUR_IN_SECONDS * 4 );
    		return $movies;
    

    Now, what happens if new movie is added or existing movies rating get’s decreased. We should not store the stale data and fetch the fresh data.

    For that, I got this hook that we can use which will fire when post meta is updated.

    		add_action('update_postmeta', array($this, 'delete_transients_on_meta_update') , 10, 4);


    Now we can use this to check if the post meta is updated then we can just delete the transients instead of updating them with new data.

    Out code will then add the data in the transients again.

    /**
    	 * Delete transients on meta update.
    	 */
    	public function delete_transients_on_meta_update($meta_id, $object_id, $meta_key, $meta_value ){
    
    		if('rt-movie' !== get_post_type($object_id)){
    			return;
    		}
    
    		if('rt-movie-meta-basic-rating' === $meta_key){
    
    			delete_transient('mlb_top_rated_movies');
    		}
    
    	}


    Note : I am still working on how to also hook into save_post and invalidate the transients when new movie is added.


    User Roles and Capabilities

    There are below rules by default in wordpress

    • Super Admin
    • Administrator
    • Editor
    • Author
    • Contributor
    • Subscriber

    We can add our own roles too. For that we can use functions:-

    • add_role()
    • remove_role()

    We can assign capabilities to this roles or remove them using

    • add_cap()
    • remove_cap()

  • day 42

    • Dashboard widgets
    • Adding widget
    • Rewrite API intro

    Dashboard Widgets

    By default there are some widgets on the dashboard like welcome , at a glance , activity , site health etc.

    Like almost everything else in WordPress, the dashboard is also extensible. We can add our own widgets and display them in the dashboard.

    Widgets are basically meta boxes that we can display info into or collect info from. Like a widget that gives info of site views etc.

    How to add new widgets?

    The dashboard widget API provides us with a function wp_add_dashboard_widget(), Using it we can add our own widget in the dashboard.

    I have created this widget that fetches some quotes from the endpoint https://type.fit/api/quotes , then randomly generated an index and displays the quote in the dashboard widget.

    Below is the code I used for this:-

    public function __construct() {
    		add_action('wp_dashboard_setup', array($this, 'register_dashboard_widgets'));
    	}
    
    	public function register_dashboard_widgets(){
    		wp_add_dashboard_widget('daily_quote', 'Inspirational Quote', array($this, 'daily_quote_widget_callback'));
    	}
    
    public function daily_quote_widget_callback(){
            $url = 'https://type.fit/api/quotes';
            $response = wp_remote_get($url, array('headers' => array('Accept' => 'application/json')));
            $body = json_decode(wp_remote_retrieve_body($response));
    		$random_index = random_int(0, count($body)-1);
    		$quote = '<h1>' . esc_html($body[$random_index]->text) .'</h1>' ;
    		echo $quote;
        }
    

    Rewrite API intro

    The wordpress rewrite api allows us to specifiy new rewrite rules. It has below functions:-

    • add_rewrite_rule()
    • add_rewrite_tag()
    • add_rewrite_endpoint()

    Rewriting is used so we can create pretty links like /best-movies-2023 which will be then mapped with the actual resource.

    This same post you can access using https://pratiklondhe.wordpress.com/?p=799 but it doesn’t look good and search engines also penalize us for this url. We can use the rewrite rules for that so the same post can be accessed at https://pratiklondhe.wordpress.com/2023/09/06/day-42/


  • day 41

    Making HTTP requests from wordpress ?

    We can make HTTP requests like GET,POST and HEAD using the helper functions in core.

    The methods we can use are in the http.php file.

    • wp_remote_get()
    • wp_remote_post()
    • wp_remote_head()

    We can use this methods to make the respective requests

    // The GET
    
     $url = 'http://getit.local/wp-json/';
     $response = wp_remote_get($url);
    
     echo '<pre>'; 
     print_r($response);
     echo '</pre>';


    This will make GET request and return the response

    There are also some helper functions to get only the body or only some specific header

    • wp_remote_retrieve_body()
    • wp_remote_retrieve_response_code()
    • wp_remote_retrieve_header()
    wp_remote_retrieve_body()
    • retrieves the body of the response
     $url = 'http://getit.local/wp-json/';
     $response = wp_remote_get($url);
     $body = wp_remote_retrieve_body($response);
    
    wp_remote_retrieve_response_code()
    • Retrieves the response code
     $url = 'http://getit.local/wp-js0n/';
     $response = wp_remote_get($url);
     $response_code = wp_remote_retrieve_response_code($response);
     if(200 !== $response_code){
    	echo __('Might be some issue');
     }
    

    We can get all the headers or a specific header, for that we can use wp_remote_retrieve_header() or wp_remote_retrieve_headers() to get the headers as array


    Transient API

    In wordpress transient api can be used to cache the data in a standard way and for a specific time frame.

    These API methods are in the option.php file, as the transient is just using the options API with timed expiration.

    We can get and set the transient, we have to use a unique identifier for that.

    • get_transient()
    • set_transient()
    • delete_transient()

    Also, if we are in a multisite setup and want the transient to be accessible network wide we can use the site_ methods

    • get_site_transient()
    • set_site_transient()
    • delete_site_transient()
    $url = 'https://api.github.com/users/pratik-londhe4';
    $response = wp_remote_get($url);
    $body = wp_remote_retrieve_body($response);
    set_transient('github-user', $body, 60);
    
    $user = get_transient('github-user');
    echo '<pre>';
    print_r($user);
    echo '</pre>';
    

    Code to test the transient api.

    We can set the expiration of the transient as the thir argument, we can use seconds or there are constants that we can use to define the time.

    • MINUTE_IN_SECONDS
    • HOUR_IN_SECONDS
    • DAY_IN_SECONDS
    • WEEK_IN_SECONDS
    • MONTH_IN_SECONDS
    • YEAR_IN_SECONDS

  • day 40

    • Changing the default base wp-json to something else
    • Create sub command of a main command
    • Different ways to log ouput in WP CLI
    • Optional positional arguments?

    Can we change the default prefix of the wp rest api ?, there’s a hook for that!

    We can use the filter rest_url_prefix to change the default wp-json to something else

    add_filter('rest_url_prefix', function(){
    	return 'api';
    });
    

    We can see that when sent a get request to site root , we get the Link header containing the API link.

    But if we try to access it, it will give 404 error, as only updating from here will not be enough we will have to update the rewrite rules too.

    For that we can quickly go to settings>permalinks and click on save to rewrite the rules, and it starts working.

    Just because we can change the base, should we?

    No, in most cases except for some use cases we don’t have to change the base as other plugins or applications maybe depend upon that.


    Can we create a subcommand for a main command like core, db or something?

    Yes, we can. While registering the command we can add it as a subcommand for other command

    /**
     * Say hello
     */
    function sayhello(){
    	WP_CLI::error('hello');
    }
    WP_CLI::add_command('core sayhello' , 'sayhello');


    This will register a sub command sayhello under core command


    WP CLI not only supports success and error log but also below output methods:
    • WP_CLI::error('hello');
    • WP_CLI::success('hello');
    • WP_CLI::line('hello');
    • WP_CLI::warning('hello');

    Or we can just use our echo to output

    Here is how they all look from CLI

    Notice that I have put the error at the end, as putting it before will just terminate the execution and other output will not work.


    Can we set the positional arguments in CLI as optional?

    Positional arguments can be made optional by wrapping them in []

    /**
     * Say hello
     * 
     * ## OPTIONS
     * 
     * [<name>]
     * : Name of person
     */
    function sayhello(){
    .....
    

  • end of week 8

    • Custom route pagination
    • CORS

    Adding Pagination to custom routes

    So, the deault routes have query paramters like page and per_page to handle pagination, we can also that in out route.

    When we send request to a builtin route like wp/v2/posts , in the headers we get two headers for pagination :

      X-WP-Totalno. of total pots
      X-WP-TotalPagestotal pages

      So, in order to make our rest api also similar we can expose these headers and also allow the paramters page and per_page for this.

      This is the code I have written.

      function resgister_celebs_route() {
          register_rest_route(
              '/rt-movies/v1/',
              '/celebs',
              array(
                  'methods'  => 'GET',
                  'callback' => 'celebs_route_callback',
                  'args'     => array(
                      'page'     => array(
                          'type'        => 'integer',
                          'description' => 'Page Number',
                      ),
                      'per_page' => array(
                          'type'        => 'integer',
                          'description' => 'Number of posts per page',
                          'default'     => 10,
                      ),
                  ),
      
              )
          );
      }
      
      add_action( 'rest_api_init', 'resgister_celebs_route' );
      

      This is code of the function that will handle our pagination

      function celebs_route_callback( WP_REST_Request $request ) {
          $request_params = $request->get_query_params();
          $default_params = array(
              'page'     => 1,
              'per_page' => 10,
          );
      
          $params = wp_parse_args( $request_params, $default_params );
      
          $args = array(
              'post_type'      => 'rt-celebs',
              'posts_per_page' => $params['per_page'],
              'paged'          => $params['page'],
          );
      
          $query       = new WP_Query( $args );
          $posts       = $query->get_posts();
          $total_posts = $query->found_posts;
          $total_pages = ceil( $total_posts / $params['per_page'] );
      
          // Return 400 if page number if greater than total pages
          if($params['page'] > $total_pages){
              return new WP_Error( 'invalid_page_number', 'Invalid page number', array('status' => 400 ) );
          }
      
          // Prepare the response.
          $response = new WP_REST_Response();
          $response->set_data( $posts );
          $response->header( 'X-WP-Total', count( $posts ) );
      
          $response->header( 'X-WP-TotalPages', $total_pages );
      
          return $response;
      
      }
      

      Cross-Origin Resource Sharing (CORS)

      Cross-Origin Resource Sharing (CORS) is an HTTP-header based mechanism that allows a server to indicate any origins (domain, scheme, or port) other than its own from which a browser should permit loading resources.

      MDN

      So basically, browsers follow same-origin policy , means if your web app tries to make request to an api on a differetn domain, it will not work.

      But what if the request is necessary, like you have a decoupled architecture and hosted multiple api on different domains and for frontend the domain is different. For that we have to allow CORS

      It work by HTTP headers mechanism, means we can set header that tell the browser that this specific domains CORS are allowed

      here are the HEADERS used in CORS

      Access-Control-Allow-Origin: https://myapi.com
      Access-Control-Allow-Methods: POST, GET, OPTIONS
      Access-Control-Allow-Headers: X-PINGOTHER, Content-Type
      

      To use this in wordpress, we can hook into the pre server request and update the header.

      function set_cors_headers($value) {
      	header( 'Access-Control-Allow-Origin: *' );
      
      	return $value;
      	
      }
      
      add_filter( 'rest_pre_serve_request', 'set_cors_headers', 999 );
      

      Why the priority is set 999, well ther is a function in rest-api.php named rest_send_cors_headers() which also set the cors headers but it sets so that all origin request are allowed.

      So we have to make sure that our function runs after that

      Why not just unhook the function and use our own? , yes it is also possible to do.

      Restricting API access to only one host

      function restrict_api() {
      	$allowed_host = 'getit.local';
      
      	if ( isset( $_SERVER['HTTP_ORIGIN'] ) && $_SERVER['HTTP_ORIGIN'] === $allowed_host ) {
      		header( "Access-Control-Allow-Origin: $allowed_host" );
      	} else {
      		wp_send_json_error( array( 'message' => 'Requests not allowed from this host' ), 403 );
      		exit;
      	}
      }
      
      add_action( 'rest_api_init', 'restrict_api' ,9999);
      
    • day 38,

      WP-CLI, intuitive commands

      The wp cli is a great tool, also it’s commands are intuitive. If we just know the core commands, we can guess what command would be to do something

      e.g. what would be a command to create a post? it is, arguments? We can use --prompt flag so the command asks us all the arguments.

      It is very easy to learn the commands when we start with an objective, say we have to generate some dummy posts on our demo site, what would be the command for that, it is wp post generate


      WP REST

      • WP_REST_Server
      • WP_REST_Request
      • WP_REST_Response

      Above classes are used in WP REST API to handle request response

      When we register a callback function for our route, object of WP_REST_Request is passed to it, then we can use it to get the body and return some response.

      For that we can use the WP_REST_Response class, We can create its object to send custom response , with custom headers and stuff.

      The WP_REST_Server is the class used to implement the server

      Like most of the things in WordPress, it used an array to store all the endpoints


      Endpoint that return `405` on invalid post body

      add_action('rest_api_init', 'is_it_json');
      
      function is_it_json() {
      	register_rest_route('is_it_json/v1', '/verify',array(
      		'methods'  => 'POST',
              'callback' => 'is_it_json_callback',
      	));
      
      }
      
       function is_it_json_callback(WP_REST_Request $request){
      	$body = $request->get_body();
      	
          $data = json_decode($body);
      	// inValid json
      	if(null === $data){
      		return new WP_Error('invalid_json', 'Invalid JSON', array('status' => 405));
          }
      
      	
      }
      

      This will only work for the custom route.


      WP User and WP Post command

      We can perform CRUD operations on Users and posts from this commands

      Here’s what I did, first listed all the users on my site, then changed role of one of the user

    • day 37,

      • wp eval
      • wp db

      wp eval : execute php code

      Using wp eval command we can execute any php code, we have to provide the code as string.

      This command also loads the wordpress core, we can skip that and not load it using the option –skip-wordpress

      Above command runs even when we don’t have the WordPress installed

      wp eval-file

      Similar to wp eval, we can use wp eval-file , to execute php code.

      Instead of giving it a string, we can provide filepath and it will run it.

      These commands are helpful when we have to quickly run some files

      wp db : for database operations

      The wp db command can be used to perform operations on the database.

      We can create new database, drop existing database or even run a query from a sql file on the database.

      To connect with the database it uses wp-config.php file, so we have to put our db username passwords.

      wp db cli

      Using this command we can open the mysql cli and perform the operations from there.